08.19.2026 PropStream
| Quick Answer: To launch a Direct Mail campaign in PropStream, start with the properties you want to reach, choose a send type, select and customize your mailers, and review your campaign before placing the order. Once your campaign is live, you can track each mail piece and monitor delivery progress from the Direct Mail Dashboard. |
Whether you’re reaching out to a handful of property owners or building a larger outreach campaign, direct mail is one of the most effective ways to reach prospects and stay top of mind, with nearly 7 in 10 marketers ranking it as their highest-ROI marketing channel.
PropStream’s redesigned Direct Mail experience makes the process easier by bringing campaign setup, design, delivery options, and tracking together in one place.
In this guide, we'll walk you through launching your first Direct Mail campaign in PropStream, from choosing your recipients and campaign type to designing your mail piece and submitting your order.
Before You Start: Complete Your Marketing Profile Info
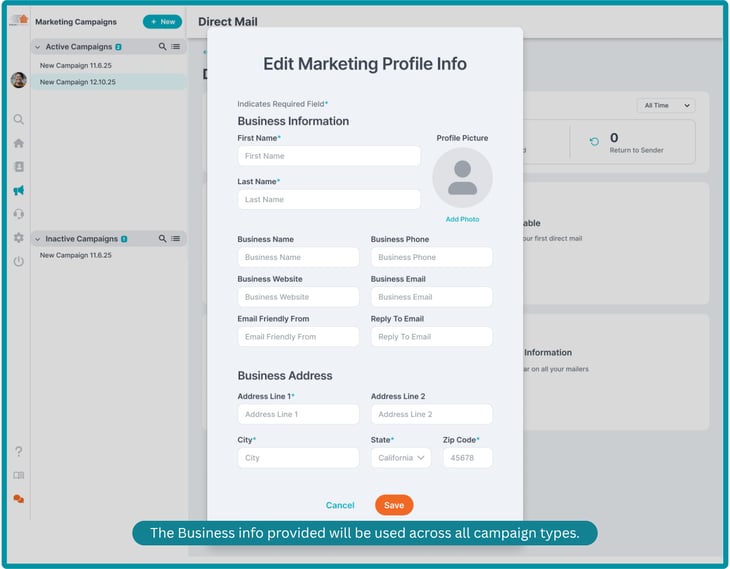 Before creating your first campaign, make sure your Marketing Profile (sender information) is complete and up to date. This information is used to populate the sender details for your Direct Mail campaigns.
If you create a campaign directly from the My Properties page and your sender information is incomplete, you’ll be prompted to update it before you can proceed.
You can review or update your sender information at any time in your account settings.
Pro Tip: If you have team members using your account, make sure the primary account holder completes the sender information first, as only they can add or edit these details. Once set up, team members can create, customize, and send Direct Mail campaigns.
Step 1: Select the Properties You Want to Mail
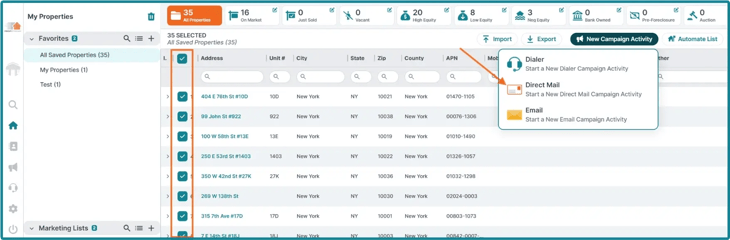
From My Properties, select the properties you want to include in your campaign from a Marketing List.
| Don't have a Marketing List yet? Watch this quick video to learn how to search for and save properties into a Marketing List. |
Once you've opened your list:
- Select the properties you want to include in your Direct Mail campaign.
- Click the New Campaign Activity dropdown.
- Select Direct Mail.
- You'll then be prompted to either create a New Campaign or add the properties to an existing Marketing Campaign.
You can also start a Direct Mail campaign from the Campaigns dashboard. Click New Activity and select Direct Mail.
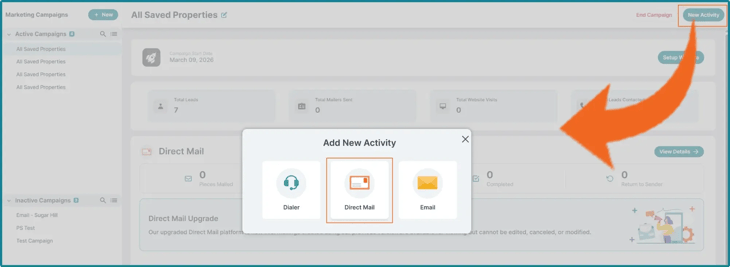
For your first Direct Mail campaign, you can enter a new Campaign Name and click Save to continue.
Pro Tip: If you’re new to PropStream, it’s worth knowing about PropStream Connect. It can help you save on Direct Mail while expanding your outreach with free skip tracing, Click-to-Dial, Dialer Campaigns, and Lead Automator. PropStream Connect is available as an add-on with the Essentials plan and is included with Pro and Elite plans.
Step 2: Choose and Configure Your Direct Mail Type
Next, choose how you want to send your Direct Mail campaign. You’ll have three flexible Direct Mail types to choose from: Single Send, Multi Send, or A/B Split Test.
- Single Send: Send a one-time mail piece to your selected properties. This is a good option for one-off outreach or testing a new list.
- Multi Send: Send multiple mail pieces to the same audience over time. You can choose the number of sends and the interval between each one.
- A/B Split Test: Compare two different mail pieces by splitting your selected properties between Variant A and Variant B. You can test different formats, sizes, writing styles, designs, or messaging.
|
Not sure which campaign type is right for you? |
Configure Your Multi-Send Drop Sequence
For this walkthrough, we’ll choose Multi Send Drop and configure the drop sequence based on how often you want to reach your recipients. Having multiple touchpoints increases your chances of connecting with the homeowner.
|
Build your Drop Sequence by choosing:
|
We’ll choose to send 4 mailers 14 days apart, for example.
As you configure your sequence, the timeline will automatically show your scheduled send dates, along with the campaign’s total duration, total number of mail pieces, estimated cost range, and estimated arrival date of the final piece.
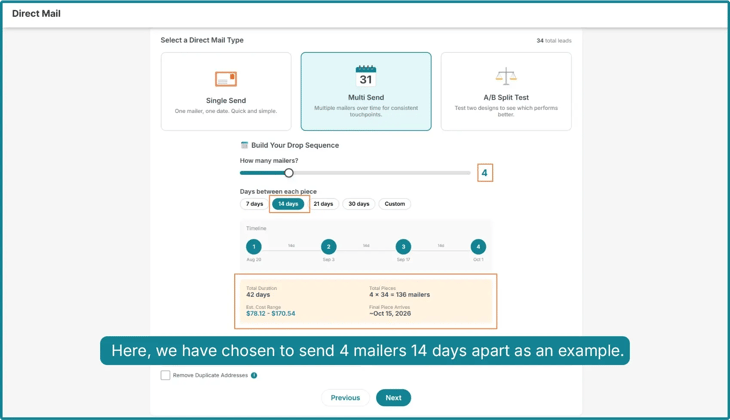
Before moving on, you'll also need to select the delivery address (Mailing Address, Property Address, or Both), choose whether to remove duplicate addresses, and name your Direct Mail campaign for better identification and tracking.
Step 3: Choose and Design Your Mailer
Start by browsing the library of available mailers, including Postcards, Classic, Home Services, Hybrid Letters, Greeting Letters, and Letters. You can also select Design Your Own to start from a blank canvas and create your own mail piece.
Since we selected 4 mailers for our Multi Send Drop, we’ll need to choose 4 mailers from the available templates, one for each send in the sequence. (Refer to the image below).
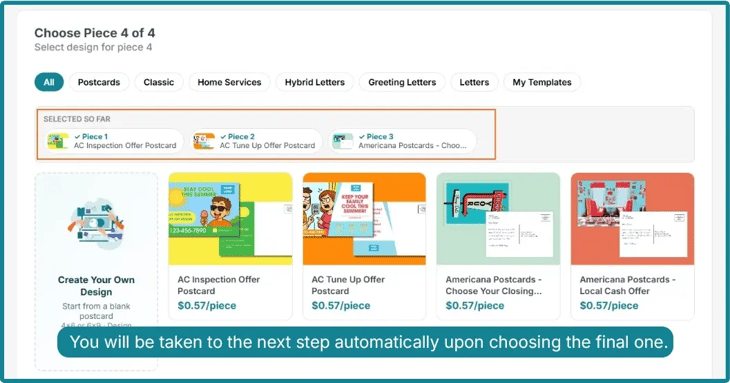
Once you select your fourth mailer, you’ll be taken to the Review Your Multi Send Order page. Here, you can review your Campaign Timeline along with each of the mailers you selected for your sequence and their scheduled send dates.
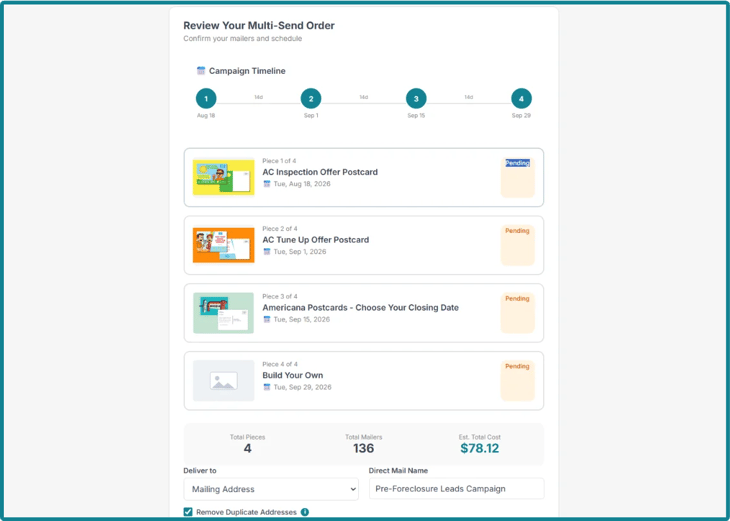
Note: Each mailer can be customized in the next step. If you leave a mailer unedited, it will be sent as-is on its scheduled date. The design of some mailers can be customized, while others are fixed, but messaging can be customized on any mail piece.
Step 4: Customize Your Mail Piece(s)
Next, customize each mailer in your sequence one by one. Start by selecting your first mail piece and reviewing its settings. Once complete, you can move on to the next mailer.
|
For each mail piece, review and adjust the following settings as needed:
|
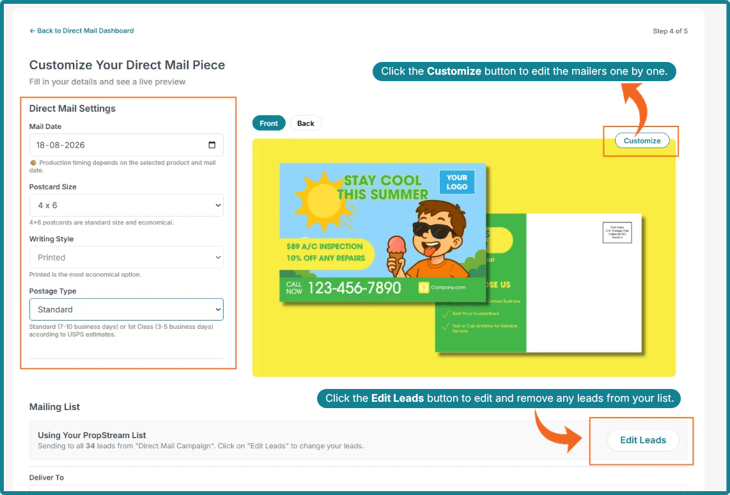
If you don’t make any changes, your mail piece will follow the interval selected in Step 2, with Standard Mail and 4x6 size applied by default.
Pro Tip: Choose the postage option that best fits your campaign. Standard Mail offers great value, with 4x6 postcards starting at $0.57, while First-Class Mail starts at $0.59 and provides faster delivery and automatic forwarding. Both options provide Return to Sender (RTS) benefits, so you can identify undelivered mail from your Direct Mail Dashboard. However, if you want the physical undeliverable mail piece returned to you, choose First-Class Mail.
Customizing Your Mailer Design |
|
Click Customize to open the Design Studio and easily make changes to the template. The new and improved built-in design studio gives you plenty of flexibility to customize your mail piece. You can:
|
Once you're happy with your design, click Save to return to your mail pieces. Repeat the process to customize the remaining mailers in your sequence.
Step 5: Review Your Order
Once you’ve customized all your mailers, you’ll be taken to the Order Summary.
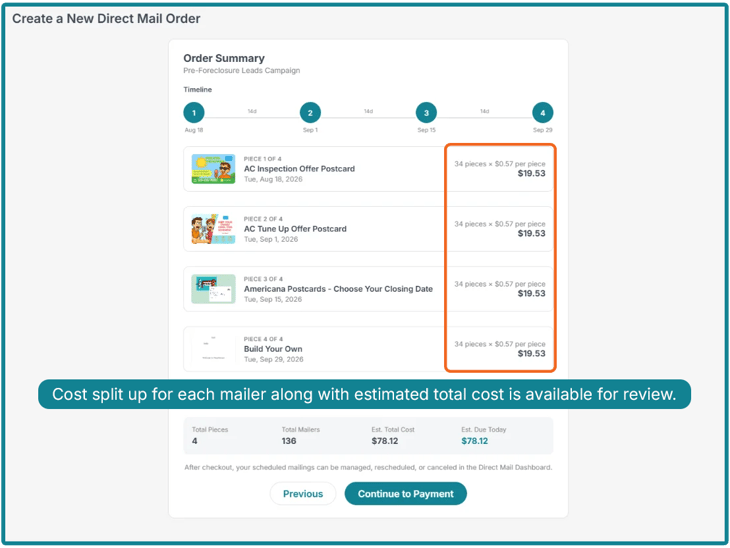
Review your order to make sure everything looks correct. If you need to make any changes, you can return to the previous steps. Otherwise, click Continue to Payment.
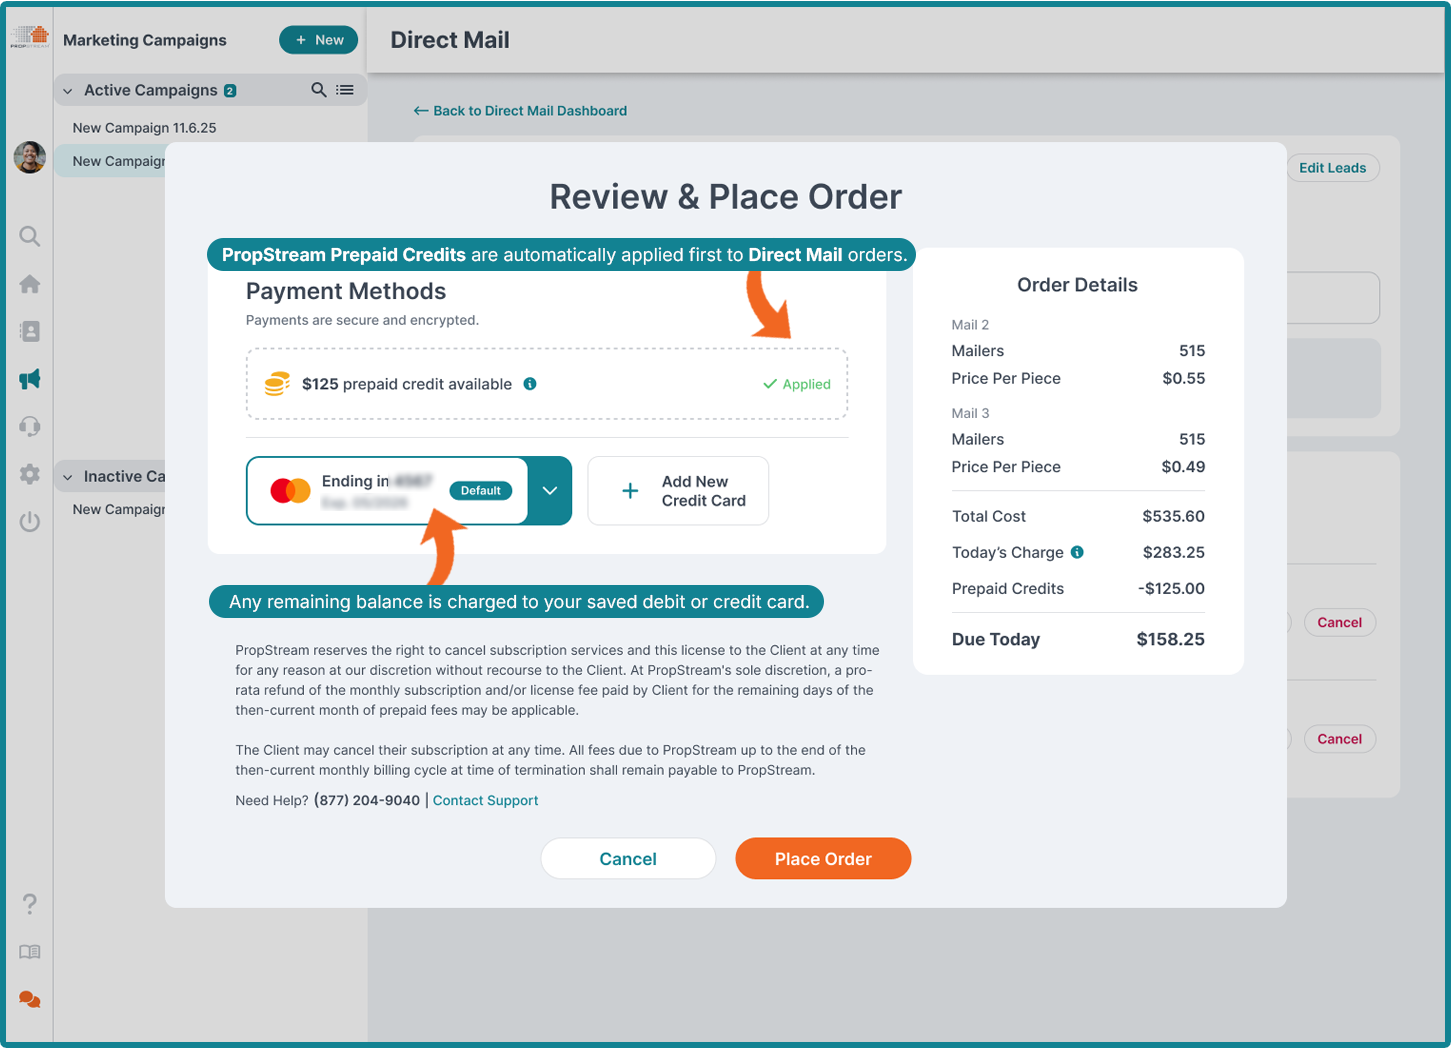
PropStream Marketing Prepaid Credits are the preferred payment method for a smoother, quicker checkout. If you have credits available, they’ll be applied to your Direct Mail order first, and any remaining balance will be charged to your saved credit or debit card.
Need to add credits? Learn how to add Prepaid Marketing Credits to your PropStream account.
Review the total cost, prepaid credits, and amount due today. Once everything looks correct, click Place Order to submit your campaign.
Note: Because each send in a Multi-Send Drop is billed separately, payment issues with one send will not cause subsequent sends to be canceled. If payment is updated promptly, the rest of the campaign will proceed as scheduled.
Making Changes to the Campaign After Placing Your Order
You can still edit, reschedule, or cancel a mail piece after placing your order, as long as it hasn’t entered its fulfillment lock window.
Fulfillment windows are as follows:
| Mail Type | Edit Window |
| Printed Postcards | Changes locked 3 days before the scheduled send date (T-3) |
| Handwritten Postcards | Changes locked 4 days before the scheduled send date (T-4) |
| Hybrid Mail | Changes locked 6 days before the scheduled send date (T-6) |
Note: Once a mail piece enters its fulfillment lock window, it cannot be edited, rescheduled, or canceled.
Monitor Your Direct Mail Campaign Performance Easily
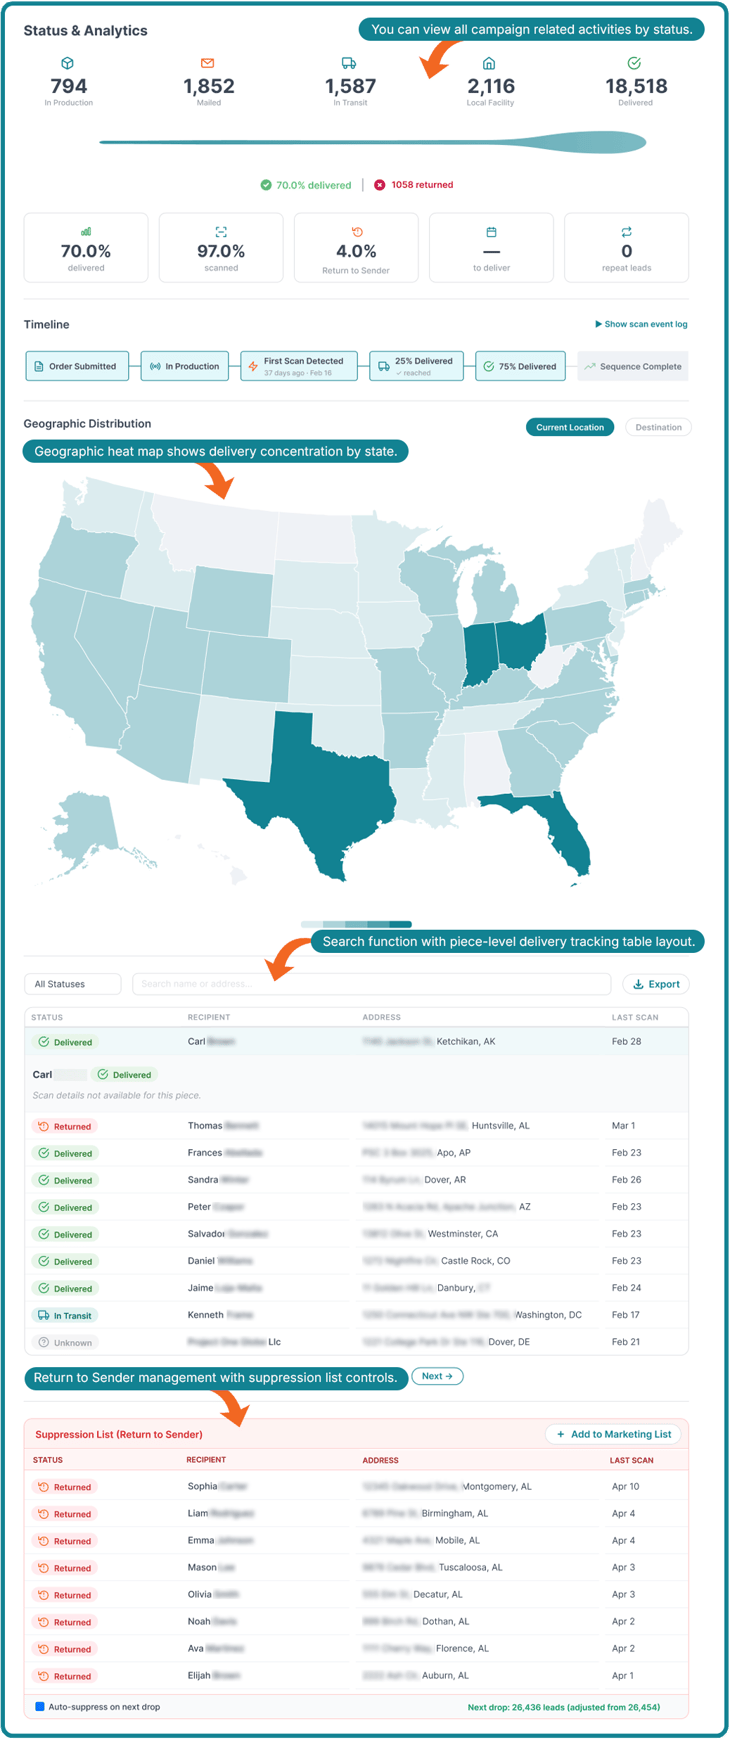
Once your campaign is live, you can monitor its progress and manage your mail activity from the Direct Mail Dashboard.
|
From the dashboard, you can:
|
Overall, the Direct Mail Dashboard helps you track and manage every campaign from start to finish, giving you visibility into each mail piece along the way.
How to Use a Different Send Type?
This walkthrough focuses on Multi Send Drop as an example, but you can also create Single Send and A/B Split Test campaigns, each with its own setup options.
To understand how each option works and which one best fits your campaign, check out our guide on Understanding Direct Mail Send Types: Single Send vs. Multi Send vs. A/B Split Testing.
*PropStream engages an independent third-party to perform skip tracing.